Monday, July 28, 2014

Task Card Storage & Organization Part 2

I can't believe it has been over a year since my original task card organization blog post!  If you haven't seen it, stop by THIS post.  I still love this set up, but I've been exploring other options to share with you.  I love a little variety in my life, and I like to have options!

In addition to the few posts I have about organizing task cards, I am also compiling as many different task card storage and organization options as I can at my task card website HERE.  Check it out for even more ideas from other teachers and bloggers!  While you're at it, you can learn more about task cards and how to use them!


Without further ado, here are a few fun ways that are Teaching With a Mountain View Tried and True!  I went out and got the supplies to try these three methods to make sure they worked with my cards.

First up is a double-decker bathroom organizer from Target.  It is the PERFECT size for the folders from the Target Dollar Spot.  I love that the bottom drawer folds out for easy access!  A fan on my Facebook page shared this find, and I had to go out and grab it myself.  Brilliant!


Next up is another method that I am incredibly excited about.  I used an over-the-door shoe organizer, and both task cards and the file folders work perfectly.  It is totally out of the way but still easily accessible, and it makes use of otherwise wasted space!  If you go this route and don't already have the file folders, I really like it without the folders, too.  It looks just as nice, and you will probably be able to fit more cards without the folders.  Speaking of fit, I could stuff A LOT of task cards into each pocket.  After all, it is made for shoes, and shoes are bulky!
Have I mentioned that I love this?  I am going to get another shoe holder because I could very well fill an entire one with literacy and an entire one with math.

If I had more than one topic (especially in the literacy sections) in a holder, I put separate labels for each one.  A few of the sections have 3 labels because there are three different skills in it.

 I used this system as a reason to get a label maker.  I can't believe I have never had one before.  My family isn't going to know what hit this house...as soon as I have time to start labeling things that aren't school related!

Here is a peek at what it looks like with the file folders.  Definitely works!

Here is the last thing I'm working on...  I love for my students to work with fluency task cards.  I always have students, though, who need even more practice.  I am making individual fluency task card booklets out of Dollar Store photo albums.  They are very thin, and they fit 32 cards perfectly.  They will keep them in their desks and practice at different times throughout the day.  This would also work well for center task card storage and organization.  I have seen it done by many people including Rachel Lynette at Minds in Bloom!


I would love to hear how you organize and store your task cards!  Shoot me an email at teachingwithamountainview@gmail.com or leave a comment here if you would like me to share your tips and tricks on my web page.

If you are looking for Task Cards, stop by my Teachers Pay Teachers store for a wide variety of paid and free resources!


Wednesday, May 21, 2014

Cooperative Learning with Task Cards

It's no secret that I'm a huge fan of Laura Candler's teaching resources.  Just a few weeks ago, we played her engaging Moving Remainders game (see HERE). This week, as we finished up long division, we used a new activity she has.  It was so easy to put together, and my kids loved this new twist on task cards!


The activity is called Solve 'N Switch, and it is done in partners.  Each pair of students is given a stack of task cards (I gave each of my students 8).  Each partner takes a card and solves it.  Then, they switch cards and solve again.  Once both students have done the same two cards, they share their answer and decide whether they agree on the answer or not  If the answers didn't match, the students used a dry erase board to walk through the problem together.  They repeat the process 4 times (for a total of 8 cards).  It is fabulous, meaningful practice, and they are working together while engaged in math conversations!  What else could you ask for?  


I loved this format because it's so easy to differentiate! In this case, I chose to partner a strong student with a struggling student so that the strong student could help explain errors and processes.  In other instances, I might choose to put  similarly achieving students together and give them a different set of task cards based on where they are in their understanding of a concept.  Perhaps some of the students could be working on two digit divisors while the others are still working on mastering those one digit divisors. 

Here is an example of the pages they turned in when they were complete.  I was able to take a quick glance over them to see how each student did (in addition to my roaming the classroom as they were working).  You'll notice the student on the left circled the check marks for each problem.  He got them all correct.  The student on the right, however, missed the second problem he did, so he put a slash through the check mark.


You can download a free set of instructions and the recording sheets you see above at Laura Candler's TpT store HERE.  While you're there, be sure to take a look around.  She has TONS of freebies and other great ideas for cooperative learning.


If you are looking for division word problem task cards, be sure to stop by Teaching With a Mountain View on TpT to grab them (HERE)!  Laura also just started creating math task cards, which you can see at her store, too (HERE)!

Friday, February 28, 2014

Using Board Games to Engage Students with Task Cards!

I'm always trying to think about new ways to use task cards since we use them so often.  My students enjoy them, and they will ALWAYS tell me that they prefer task cards over worksheets.  Always.  Hands-down!

On my way to work, I knew we would be doing a set of point of view task cards to reinforce what we have been working on.  I thought about the board games that sat on my shelf, largely unused, and considered how best I could use them in conjunction with the task cards.  I had seen some people play Jenga with task cards before, and I thought that my kids might like to do something similar.  So, we did!

I pulled out Connect Four, Chutes & Ladders, and Candy Lane...All games that the students would know how to play on their own.  Let me tell you, I've never seen 5th graders get so excited about these games!


The rules were simple.  Each group had a set of task cards, and in order to take your turn, each student had to answer a question on one of the cards.  The rest of the group had to agree with the answer before they could move on.  The group also had a recording sheet that they turned in.  Since it was in reading, the students took turns reading the cards orally to practice their reading fluency.  It was a HUGE hit, and so easy!


If you are looking for task cards, hop over to my TpT store to view many free and paid task cards!

Wednesday, February 12, 2014

Using Task Cards in Interactive Notebooks

I have been debating using task cards in my interactive math notebooks (and I even started creating a few reflection task cards specifically for interactive notebooks before taking time to do some other projects).  Then, I came across Anna's post from Simply Skilled in Second about how she used the cards in reading, and I started thinking about using them in math again.    We have been working on integers, and we were finishing up with comparing and ordering integers.  I wanted them to have some work saved in their notebooks to reference later, but I also wanted to use it as an opportunity for them to show proof of their learning.  So, off to task cards I went!

I started by printing off the task cards four sets of cards to a page.  


Then, I gave each group of four students a stack with all of the task cards (There were 5 quarter sheets of paper with four task cards on each for them to cut apart).  I instructed them to cut them apart and give one card from each piece of paper to each student  in their group.  Therefore, they all ended up with five cards, one from each sheet of cards.


I chose to do it this way so that they all ended up with a different task card, but they were all working on similar type questions.  This made it even more beneficial for them when they had to check each other's work. 


The students glued them on the left side of their notebooks, answered the questions, and justified their answers.  That was a HUGE part of this, and of course some of them had trouble with it.  I am so glad that I required them to justify their answers--writing in math is such a huge focus for us, and they need all the practice they can get.


As I mentioned before, they traded notebooks with someone else in their group and checked to see if they agreed with the answers.  This is where it came in handy to have them all working on different cards.

You could easily differentiate with task cards in the notebooks, too.  Most of my math task cards are differentiated so that students have many different ways to show their understanding!

Monday, February 3, 2014

Using Task Cards for Daily Warm Ups or Reviews

I have often used task cards for daily warm ups by throwing one or two up on the document camera and having the entire class complete it.  I created a set of Valentine's Day Math Task Cards this weekend, and I wanted to use them differently this time around since we have more time to use them, and since they are a review of so many skills.  It's test prep time, so our warm ups are all about review, review, review!


I used the Dollar Spot file folders to put a set of task cards in for each table group (you can read more about the folders at my Task Card Organization post HERE).  I labeled the sections to hold 4 cards each and then put the appropriate numbered cards behind each section.  (The labeled section that you see here has cards 9-12 paper clipped together right behind it).  You don't necessarily have to label them, but I did it so that it's easier for students to see which ones they still need to do.


I put the file folders in an adorable little bin they had at the Dollar Spot (they are the perfect size to hold the folders!) so that they wouldn't get disorganized and were easy for the kids to grab at the beginning of class.  The bin found a nice little spot next to my other task cards.


I then paired the students with another child in their same table group to work on the same 4 cards each day (or you could do 2 or 3 cards depending on how much time you have to devote to your warm up or daily review).  They don't work on the card together (although you could have them do so), they simply share the cards and then compare and check answers at the end of the warm up time.  This gives students some freedom to work at their own pace, since there are four cards divided between two students.  They can also work ahead in their file folder if they have extra time.

We tried this out today, and it worked beautifully!  Tomorrow, they will grab their same folder and select a different set of four cards to work on.  They will still be working on the same SET of task cards, just another range of cards. I love how they are reviewing different skills each day, but changing it up a bit from a normal warm up.


You can do this with absolutely any set of task cards and any subject.  Next month, I am going to put several different sets of task cards in the folders so that they have even more review.

You could easily differentiate it as well with your grouping...put all of the kids who need to review a specific skill in one group, or the kids who need enrichment in another skill in a different group, and they can work on a different set of task cards.

The task cards that my students are working on in these pictures are my Valentine's Day Mixed Math Review Task Cards.


You can see my other math task cards HERE.
Tuesday, January 28, 2014

Using Task Cards as a Whole Class Review

At one point or another, I think we have all played Jeopardy with our classes.  It's fun, the kids love it, and it's an easy way to review!  I always struggle with keeping all of the kids engaged, and we needed to do a review of fraction operations and skills, so I threw together my own version of the game using some of my task cards.

I was on the hunt for a pocket chart, and one of my sweet colleagues had one that was MADE for this kind of thing.  It is only $4 on Amazon HERE.  I didn't need the question cards it came with, but it's perfect for the size of my quarter page task cards.

 
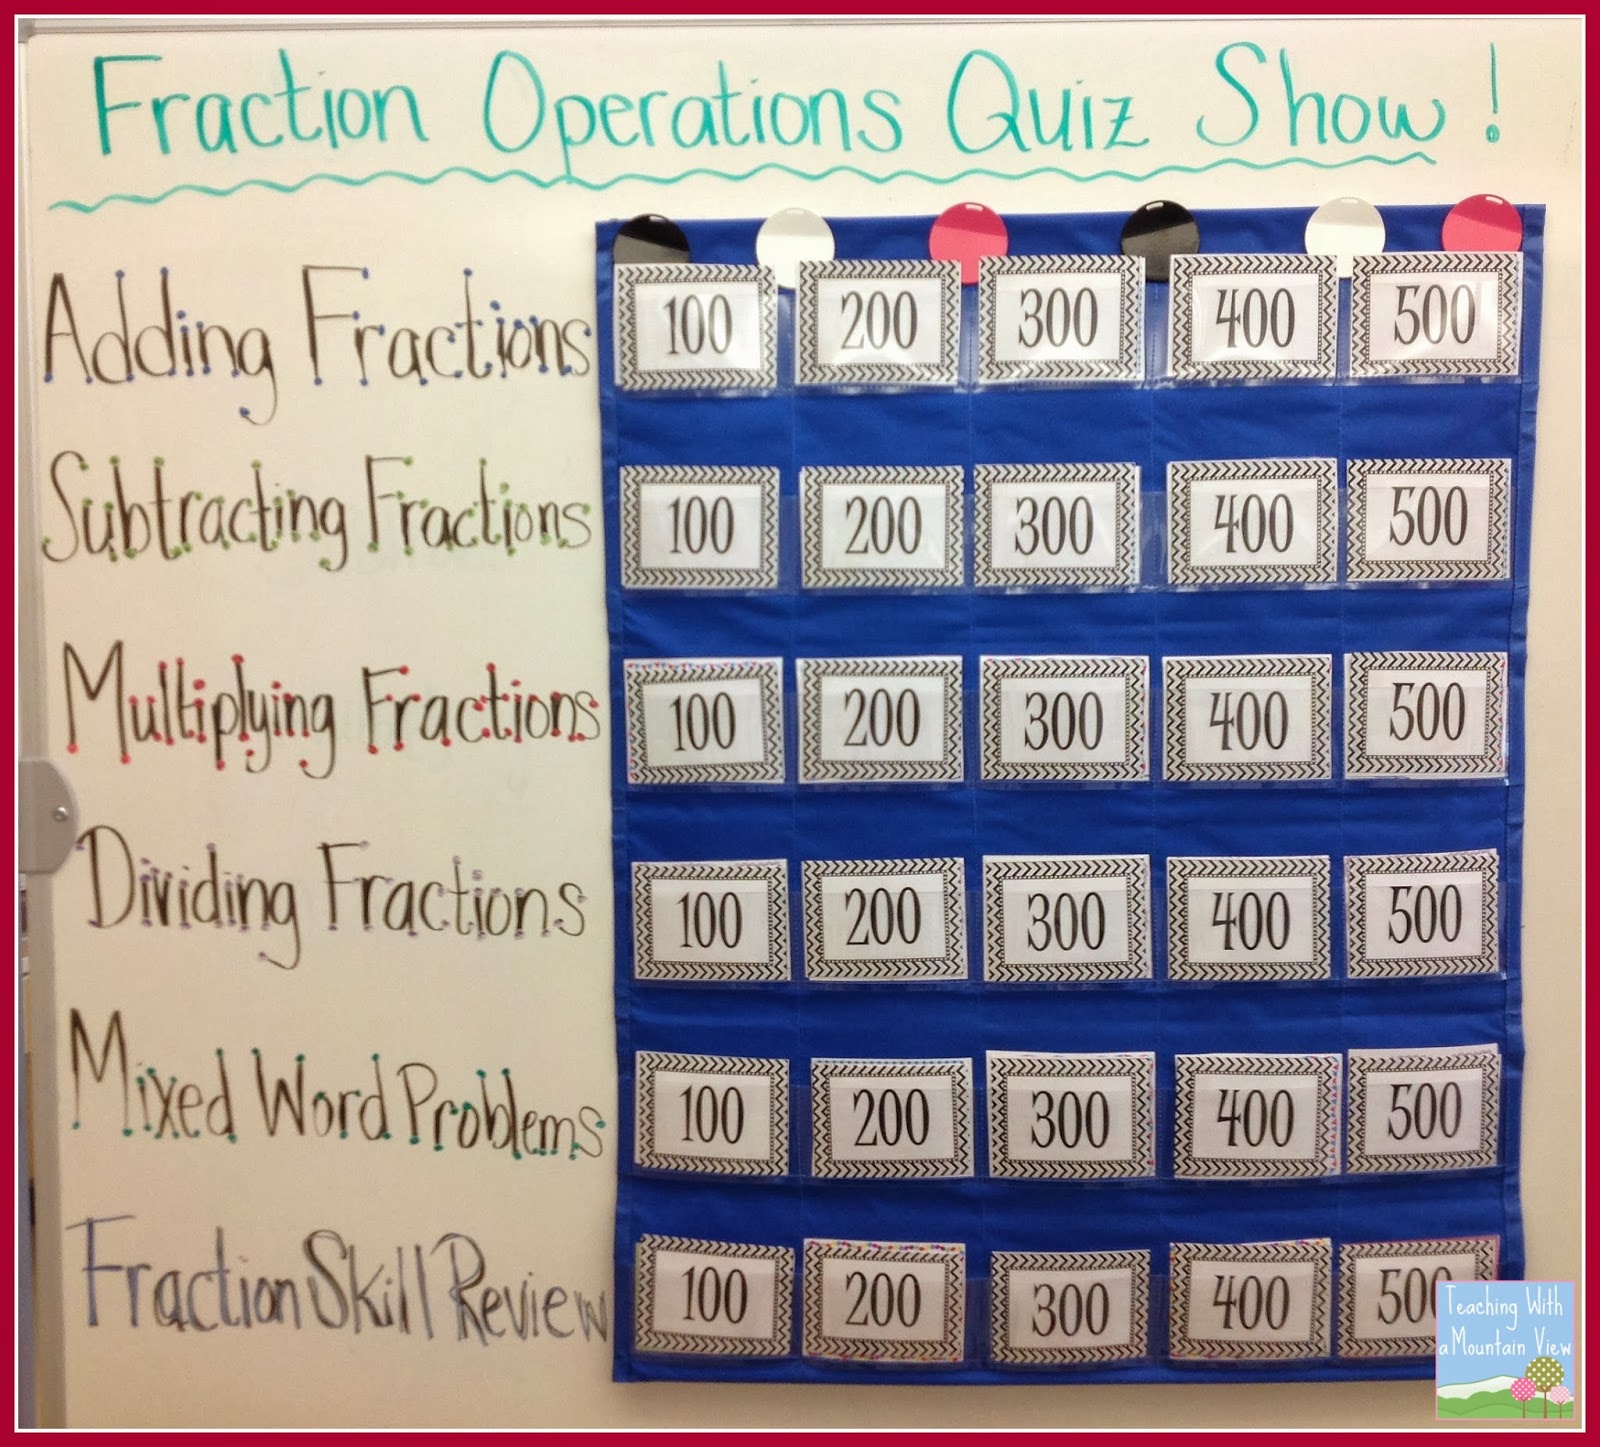
I set up the game board to include a wide variety of fraction problems including all of the operations, mixed skill review (comparing, simplifying, mixed numbers, etc.) and word problems.  I put a task card in each slot, with increasing difficulty and level of critical thinking needed to answer the problem. I covered each card with a point value ranging from 100-500.
 
Here is a look at my board...
 
Here is a look at the board before I put the point value cards on top.


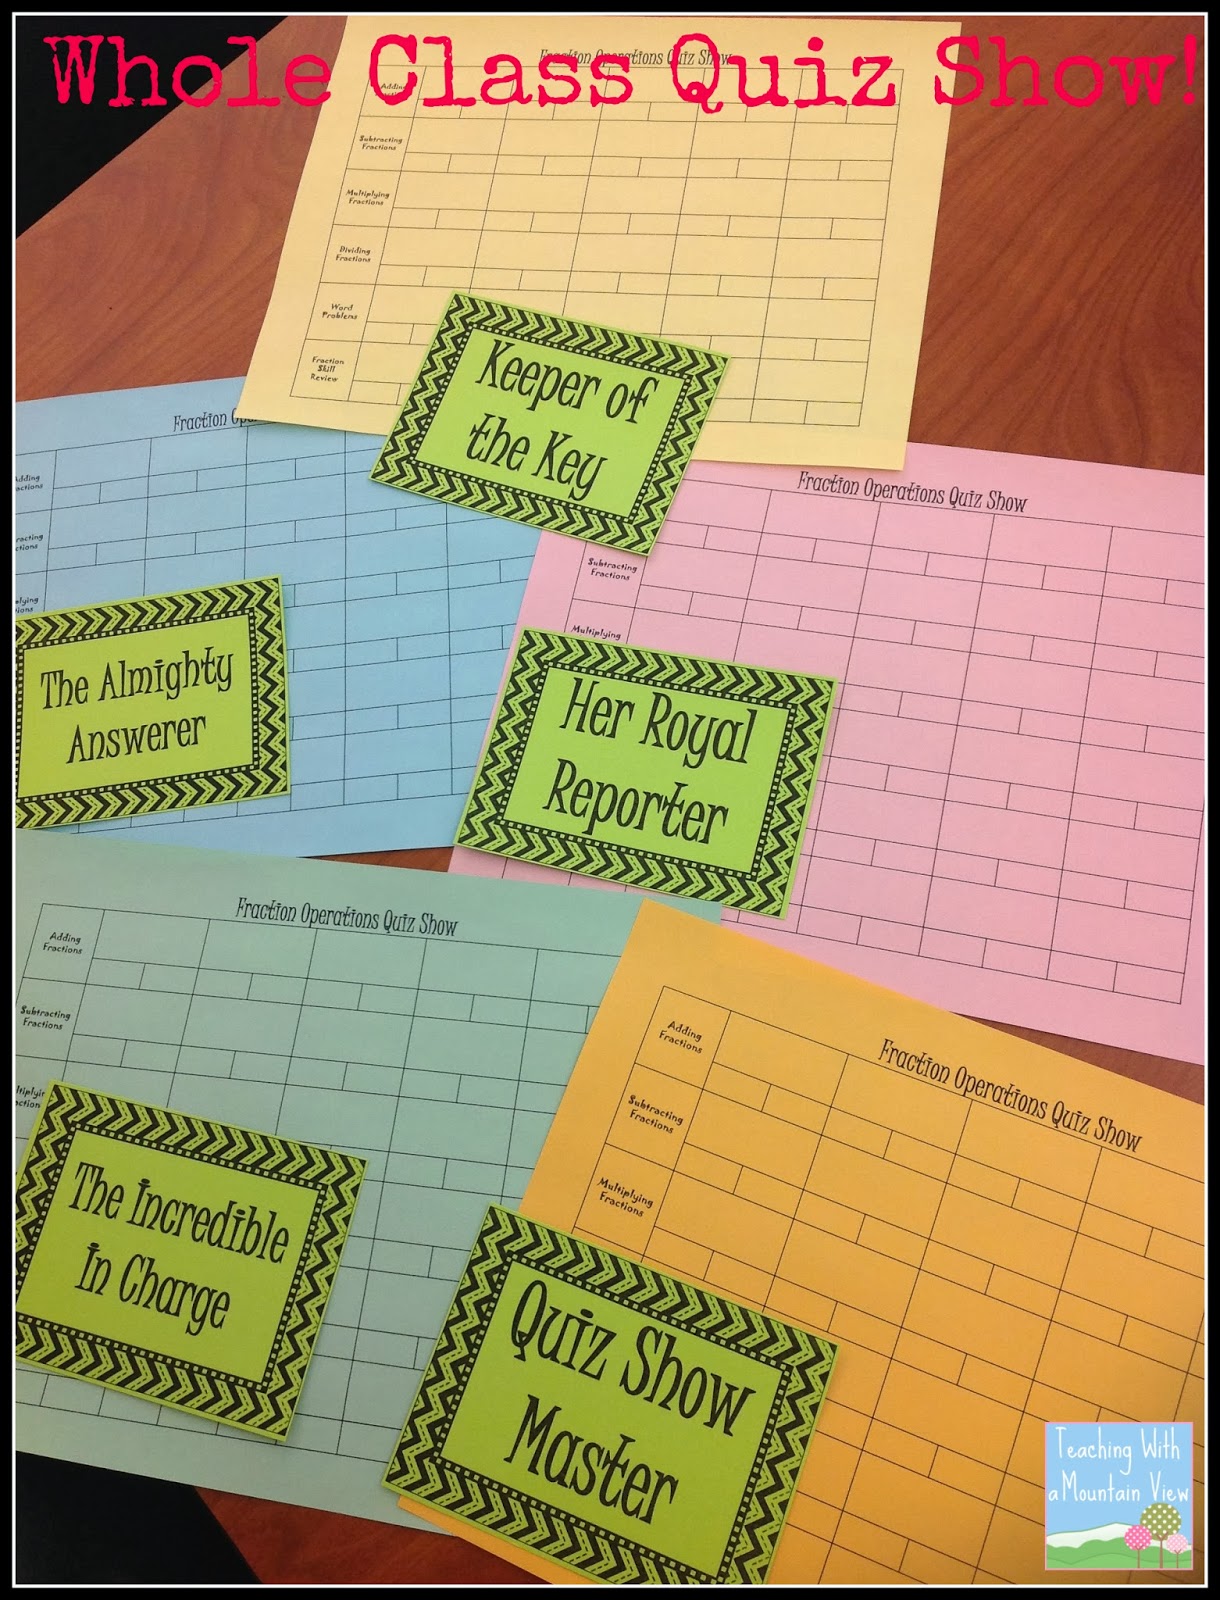
I knew I needed a way to make sure everyone was involved in the game and that each group wasn't only as strong as its strongest member and vice versa.  So, I changed things up a little bit.  Each group of students (I had 5 groups) had a silly card (named so by my students).  This silly card rotated through the group each round, and whoever had the card was in charge of reporting out their answer, and being able to explain how they arrived at their answer.  The group had to work together to solve the problem, but only the person with the card could go up and present the answer.

 
I got a little goofy with their titles, but they thought they were hilarious and lauged at me a little bit. :)
 
I also made a recording sheet that mirrored the gameboard.  Underneath each answer space was a smaller space divided in two sections.  In one section, they had to initial who was in charge of the answer, and on the right side they recorded their points.
 

I also kept them all engaged by giving each group a chance to get points each round, regardless of whether or not they were first done with the answer.  This was also me being sneaky and adding in some more multiplying fractions, and it worked!  More about the points later...

I started by selecting the first category and value and then the winner of each round got to select it from that point on.  I did a 3,2,1 countdown and put the task card on the document camera for the students to read and solve themselves.
Here's a look at one of the cards being projected up on the white board.  You can see the others we had already done underneath this one.

When the reporter and the group had solved the problem, they wrote their answer on their answer sheet.  The reporter had to walk (not run, slide, jump, or dive) up to the board and stand on one of five spots.  The first person to be done stood on spot one, second on spot two, and so on and so on.  I loved this part because it got them up and moving, and different combinations of kids were at the front each time.


A star on my (very dirty) carpet for a representative from each group to stand on when they finished the card.


I also wanted to keep the kids guessing about who was going to have to present their answer (again, I wanted EVERYONE to have a full understanding of the problem we were working on).  So, I put the numbers 1-5 in a jar and once I had a representative from each of the five groups standing on a spot, I drew a number and the person standing on that star had to share their answer and how they arrived at their answer.
 
 
I was a little worried the process might take too long, but they did great with it. It was also valuable for the students to hear other explanations for solving the problem, and the kids who got the answers wrong were able to very quickly figure out what they had done wrong.


I mentioned before that each group could get points each round if their answer was correct.  Here is how we did that.  If the student standing on star 1 (meaning they got the answer done and up to the board first) got it correct, they got the full value of the points.  If the person standing on star 2 got it correct, their group got 4/5 of the points for that card, and so on. 
 
Not only did they have to do more multiplying fractions, this helped me to emphasize that, no matter what, accuracy was more important than speed.  It was better to be the 5th group done and get 1/5 of the points than to be the 1st group done and get it wrong and get no points.  As I mentioned above, they kept track of their points on their sheet, directly under the problem they were solving. 
 
 
We are finishing up the game tomorrow, when they will add up all of their points, and we will see who was the winner for each category and also for the whole game.  The kids absolutely adored playing this, and I think they appreciated the few little twists I put on it to get everyone involved and to get the kids up and moving (we also rotated seats throughout the course of the game so that nobody had an unfair proximity advantage).  Of course, it's not fail proof, but the kids were engaged and practicing their math.
 
This picture cracks me up because I could not get a picture of the kids working that didn't have a blurry hand or pencil it in.  They were working like pros on these problems!


You can truly do this game with any concept, any set of task cards, or even create your own problems, but we happened to be reviewing fractions.  Here are the task cards I used in each section.  They are differentiated so that there are cards appropriate for values 100-500.
 
 
You can download the number cards and the recording sheet I used HERE.  It's nothing fancy because I wanted the students to have plenty of room to do their recording.  The frames for the numbers are from Pink Cat Studio.  Love her cute frames and borders!
 
If you're looking for a standard review for operations with fractions, you can download my FREE quiz or review from my TpT store.  I used this last year with great results!  Download it HERE.
 
 
Tuesday, January 21, 2014

Two New Ideas for Using Task Cards!

Is your task card collection growing?  Mine seems to grow every week, and I'm always looking for new, fun ways to use the cards with my students.  They love task cards no matter the format, but the more fun and exciting I can make them, the better.

Last week, as we were reviewing percentages, we did a little scavenger hunt.  There were 32 cards, which all had either a whole number answer, decimal answer, or percent answer.  I separated the cards into three different areas and hung them on a wall with a label to show the type of answer the card had.


Then, I used the answer key to write each answer on a separate sticky note.  I gave each of the students a sticky note and instructed them to put their sticky note above ANY card in the hallway, as long as it was in the correct section (i.e. if their answer was a percent, it had to go above a card in the percent section). 


Once every card had an answer above it, the students chose a starting card and went to work.  When they solved the card, they had to find the sticky note with their answer on it and then complete the card below it.  (I also had them put their numbers in order from least to greatest, but that was just a little something extra, and another way to make it easier for them to find their next card when they found their answer.)

You can do this with virtually any math task cards, and it's a great way to self-check!  The kids loved going from card to card and then figuring out where they needed to go next.  Bonus: They were up and moving the entire class instead of sitting at their desks!

If you are looking for a pre-made version of a scavenger hunt, I have also used Jason's at The PowerPoint Maniac.  He has some really interesting math scavenger hunts...the aren't identical to this format, but my kids love being detectives and looking through clues!  You can check them out at his TpT store HERE.

One of my TpT/Blogging Friends, Blair Turner, sent me a picture of my task cards in action in a room at her school. Blair blogs at One Lesson at a Time, and she has some incredibly brilliant interactive notebook resources!  She was in a classroom using some of my fraction task cards, and this teacher had a FABULOUS idea!


The teacher, Laura, had printed the task cards and added them individually to several large pieces of chart paper.  Each group of students got a piece of chart paper and some time to complete their cards.  Then, the groups traveled to two other charts, checked the work, and flagged them with sticky notes if they disagreed with an answer.  After checking the two other charts, the original group came back tot heir poster and made any corrections to the "flagged" cards.  I'm in love with this idea, and I can't wait to try it in the next couple of weeks!

Do you have a great idea for utilizing task cards?  I will offer a free set of cards from my store for any teacher who sends me picture of their task cards in action with a description of how they are being used!  I just love seeing other ideas from across the country.

Interested in more math task cards?  Click the image below!